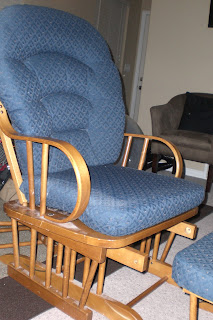
My sister Chantel is pregnant and the family could not be more excited! I am dying to know the gender so I can start shopping for him or her but for now we wait... well sort of. Chantel and her husband Mike have wisely decided that they want all the 'big ticket' items to be gender neutral, so they can use them for any future babies, they have also been trying to get the best deal they can on everything... Hence the hideousness of this chair-
They found it on craigslist... and were perfectly happy with it (I think the excitement of the new baby was blinding them...) Let me tell you, this picture makes the chair look a lot better then it really was in person. So me, being their baby's future-favorite-aunt, decided to help :)
Chantel was super excited at the prospect of a new chair and I got to work. I started with pulling out all the staples on the foot rest (so I could start the reupholstering) there were 150 little staples and my fingers were in pretty bad shape by the time I detached the cardboard off of the wood. I was very excited to be done with that part...
But it was not meant to be, as the cardboard came off I realized that I was just getting started. The fabric was also attached to the wood on the other side of the cardboard too but instead of using the same type of staples, the fabric was attached with the heavy duty kind. There were another 70 staples to pry off. by the time I was done, I wasn't sure my fingers would ever forgive me. I thought about just cutting all the fabric off but I was planning on using it as my pattern and I needed it intact.
I also started sanding the crap out if the chair to get it ready to paint. I can't describe how much dust there was! The sanding took me about 12 hours in total, I probably could have gotten away with not being quite as thorough but I really wanted this chair to be able to withstand anything (especially being around little children and their grimy little hands!)
Next I cleaned the wood so that all the dust was cleared off of it and then I primed it. I used spray paint because of all the curves, I thought it would give it a better finish and be easier. Two cans of primer later and I was ready to paint the chair white.
(you can see my husband's sexy legs in the background of this picture)
I would wipe the chair clean in between coats to make sure there were no specks in the paint. The white took a million (slight exaggeration) coats before it was done, it would have gone faster if I could have found white primer but I could only find a light gray (it worked fine but I needed more white coats overall). I also used a light abrasive to sand down any light bumps right before my last coat of white. I then finished painting it with a clear matte topcoat, it really helped with the over all 'finished' look' and gave it a great feel, once that was dry I buffed the whole thing with a paper towel. That great tip was from my husband, the paper towel was just abrasive enough to get the chair silky smooth but didn't hurt the paint finish.
(The graveyard of spray paint.)
All the sanding and painting was about 40 hours worth of work but I was meticulous, you could probably cut that time down a bit if you used white primer and if you had a clean work environment so that you didn't have to clean everything so thoroughly before you could start painting again!
It was a ton of work but I am really happy with how it turned out, want to see how it turned out? Well too bad! You will have to wait for part 2 (or maybe even part 3... who knows!)


